Maybe you've been putting those coupons to good use and you've collected quite a haul of rice mixes, syrup, and pasta. How can you effectively use what you've been bringing home? The answer is the good old-fashioned inventory system. There's a reason every store in the world uses this method. It makes you use what you have because you can see it.
Before you plan another meal, go to your pantry, freezer, and fridge and write down what you have. Be specific. How many cans of diced tomatoes do you have? I know you are hating me right now and ready to give up couponing for good. Don't! Just a few minutes every week will help you keep track of what you have and plan and shop more effectively.
I keep a running inventory for my freezer inside my recipe binder in the kitchen. When meal planning, all I have to do is check the list to see if I have any ground beef in the freezer, rather than run over and rummage through the cold. I also have an inventory list for dry goods I store in my basement pantry (my stockpile). There will be more to come on the stockpile method.
And if you're really good, I'll load my inventory template for you once I figure out how!
Monday, January 30, 2012
Friday, January 27, 2012
Fun Friday! - Kiddie Stamps
Happy Friday! After this crazy week I'm feeling the need to check in with my little guy for some uninterrupted Mommy and Me time. This is the perfect thing! I see endless hours of fun ahead. Lots of baby wipes, but endless hours of fun!
You could even use foam letters and stamp a little note for your honey. Or make a piece of art for your home. Homemade stamps are a good thing!

You could even use foam letters and stamp a little note for your honey. Or make a piece of art for your home. Homemade stamps are a good thing!
Enjoy the people you love!
Thursday, January 26, 2012
Whew!
Well, I'm exhausted. Why you ask? Pinterest! I don't know about y'all, but checking the latest pins is one of my favorite parts of my day. It's inspiring and relaxing. Well, it was relaxing until I got a bee in my bonnet and decided to start doing all the awesome things I've been pinning!
So far this week, I've DIY some "milk glass" apothecary jars, created some vintage Valentine decor, wrapped a gift with pizazz, and readied myself to make my own hand soap. Actually, all of that happened in 24 hours. I know. I'm crazy. What exactly is making me so tired? Well, friends. Running all around town to collect the various supplies, with a two year old, in the rain might have something to do with it. Why is it always raining when I have errands to run?
I have what I call "Creative Impulsivity". When I see a great idea that I think will work in my home, I've got to try it. Now. It's a good thing because I actually get things done, but it also gets me in over my head sometimes. Or, just plum tuckers me out! The good news is, there will be lots of fun pics coming soon. Just as soon as I can drop my latest project to upload some photos!
Anyone else up to their ears in projects? What's inspired you lately?
Wednesday, January 25, 2012
A Fun Valentine DIY Wreath
Hi y'all! It may be the first grade teacher in me, but I just love holidays. I get super excited for each one! I break out the themed cookie cutters, hang up my seasonal apron, and deck the halls. Well, for this holiday, just the mantel.
I knew I wanted to do a fun circle and pin wreath since I had great success with this on my burlap circle. FYI, working with burlap is messy, and itchy, and well, messy. But, it yields beautiful results. Here's a quick look at what inspired my V-day wreath:


So easy, and so pretty! Here's what you need for the red, heart shaped wreath:
Materials:

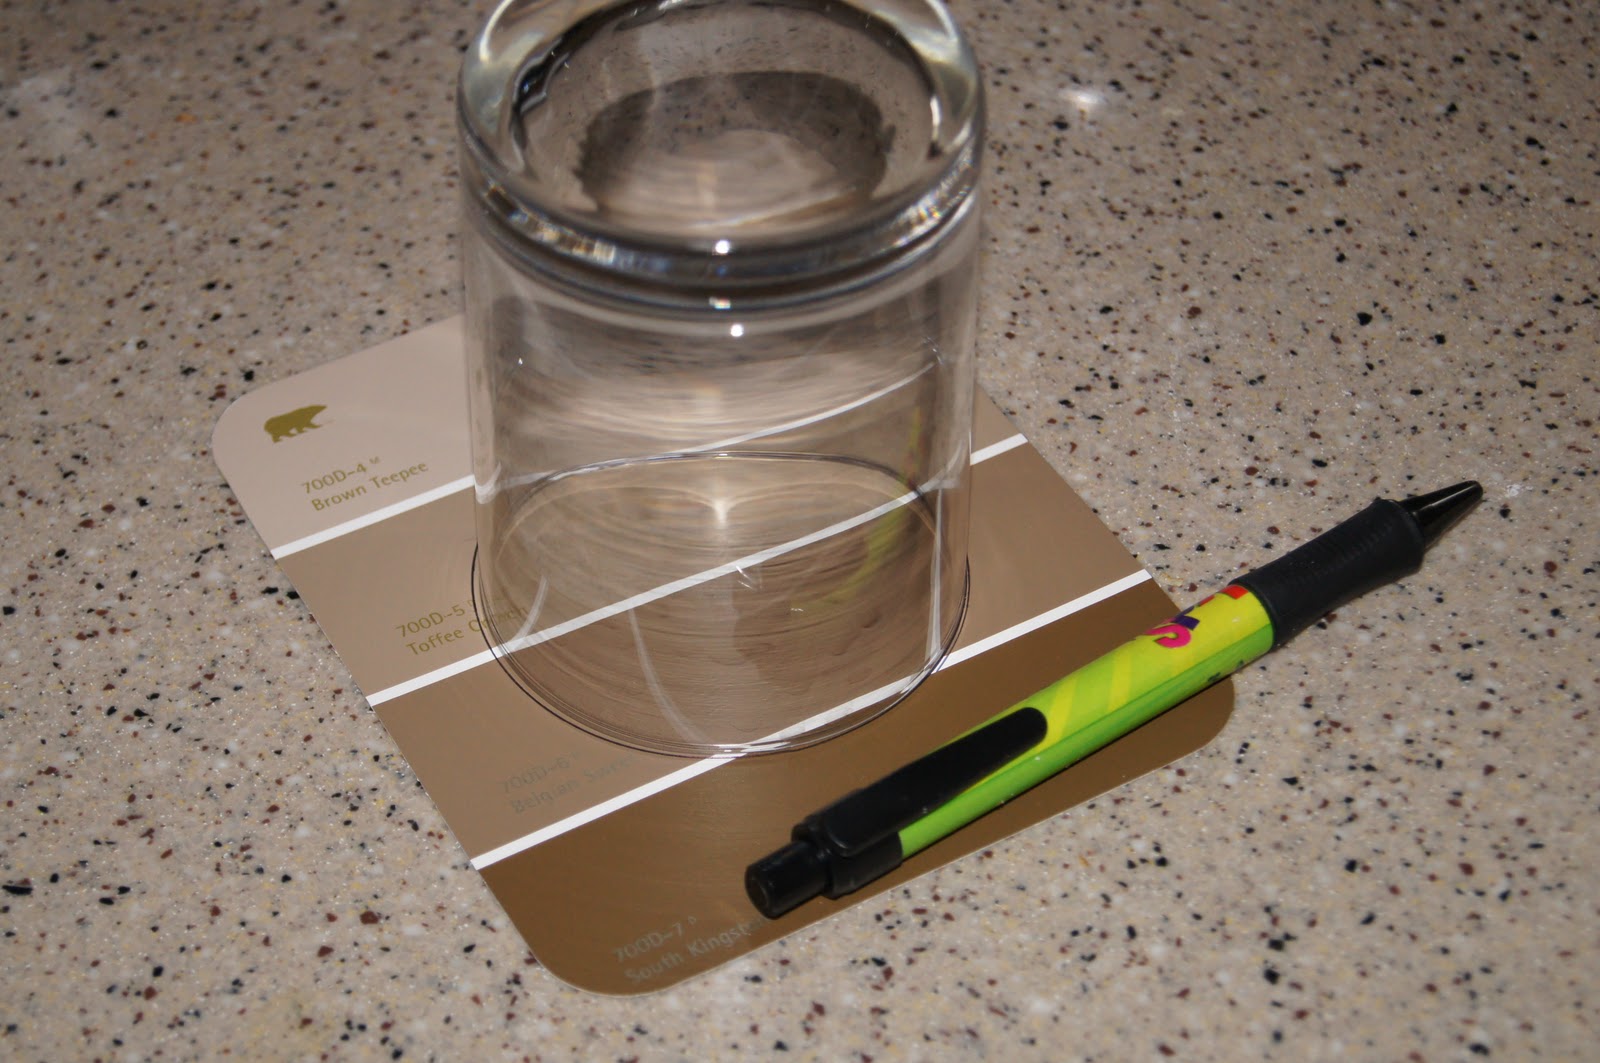
First, make your template. Just a tip, I tried a circle punch with this project and the felt is too difficult to cut this way. You're better off with a template.


Next, cut your felt into long strips about 4 inches wide, the length of the felt. Then, you will cut the strips into squares, and eventually, holding your circle template over top, cut the squares into circles. It's a lot of cutting, but you can do it! Don't cut all of your felt up at once. I did a few strips at a time in case I didn't use it all, which I didn't. This left me a big enough piece of felt to do another project with.


Then, in half again. You will have a sort of rose-bud shape. Very cute.


You did it! And it looks fab. Now, to hang it...

You could hang it on a ribbon. I tried this and I didn't like the look. I worked hard on those rosettes and I wanted them to show! So, I decided to hang it from a command hook on the mirror above my mantel. Cut a thin strip of leftover felt.


I knew I wanted to do a fun circle and pin wreath since I had great success with this on my burlap circle. FYI, working with burlap is messy, and itchy, and well, messy. But, it yields beautiful results. Here's a quick look at what inspired my V-day wreath:


So easy, and so pretty! Here's what you need for the red, heart shaped wreath:
Materials:
- 1-1.5 yards of red felt (or pink if you like)
- 1 package of dress pins
- sewing scissors
- foam heart shaped wreath form (my store had only one size)
- some sort of circle template (I made one out of a paint sample card and a juice glass)

First, make your template. Just a tip, I tried a circle punch with this project and the felt is too difficult to cut this way. You're better off with a template.


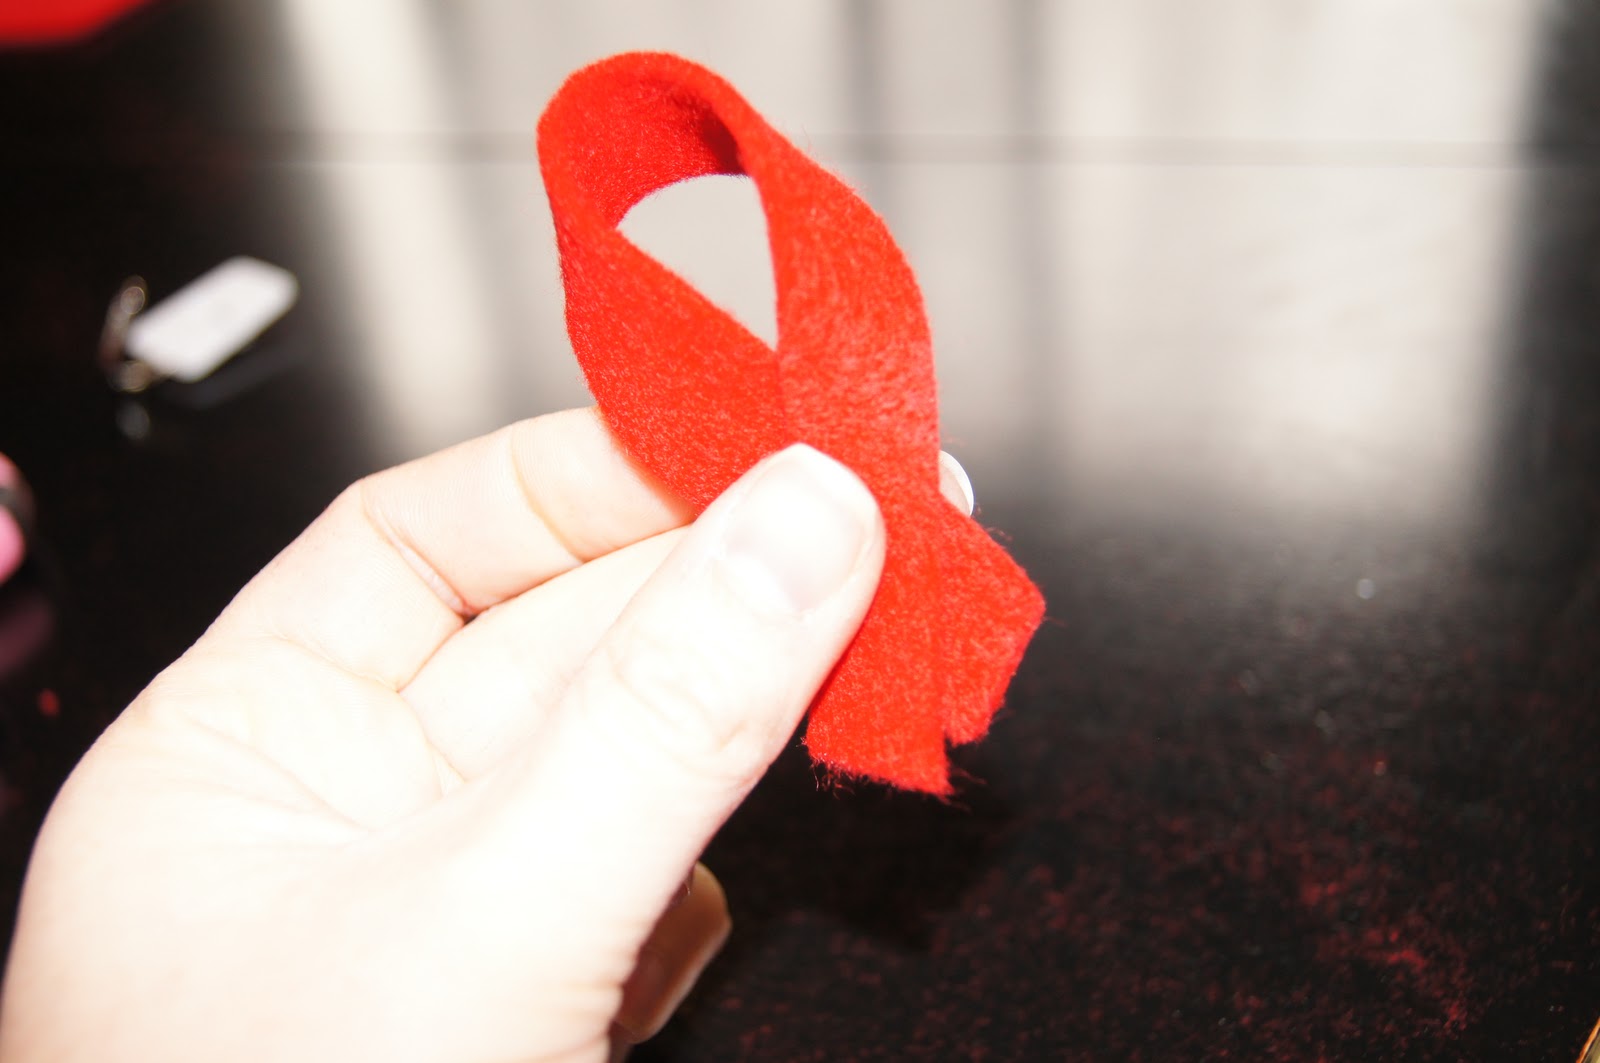
When you have enough circles, it's time to start pinning! Fold your circle in half...

Then, in half again. You will have a sort of rose-bud shape. Very cute.

Now, just pin those babies on!

Keep going! There's really no secret. Just cover the foam.

You did it! And it looks fab. Now, to hang it...

You could hang it on a ribbon. I tried this and I didn't like the look. I worked hard on those rosettes and I wanted them to show! So, I decided to hang it from a command hook on the mirror above my mantel. Cut a thin strip of leftover felt.

Cross the ends to form a loop.
Secure it into the foam with pins. I used 4 pins. Test it to make sure it will stay in when it takes the weight of the wreath.

There you go! You're festive now!

To create the rest of my Valentine Mantel, I filled my apothecary jars with seasonal candy (for another project later), tissue paper strips, and curled ribbon, which nicely decided to static cling to the sides of the jar. I also make a V-day banner with leftover felt cut into hearts and hot glued to a red ribbon. Easy peasy. Have fun trying it out!
Tuesday, January 24, 2012
Tuesday Tribute! - Artwork
One of the quickest cures to a ho-hum wall is to slap some artwork up. No Monets hiding in your closets? That's okay! Anything can be art these days. And better yet, anyone can be an artist!
Here are just a few quick ideas I've either tried, or seen around town:


What clever things have you hung on the wall? Anyone planning a gallery wall?
Here are just a few quick ideas I've either tried, or seen around town:
- Pics of your kids, pets, nature, favorite aunt - with all of the online photo developing companies nowadays, you can print photos for pennies, literally! What's even more fun, edit them! Zoom in, play with sizing, make it black and white or sepia toned. You don't have to be a photographer to have great photos around you. Print off a handful of black and whites and create a quick gallery wall. Nothing to be afraid of! A nail is not that big of a commitment, trust me, my hubs has learned to just let me hammer away! (And I've learned how to putty and paint!)

- Chairs - what?!? Oh yes. I've seen it more than once. Those cute little children's chairs, suspended from a hook right on the wall. Talk about some 3-D art!
- Hats - my mom once used a collection of old hats to make a collage on a bedroom wall. It was an awesome way to display a collection she loves, but also, to give instant visual interest to a space. You could do it with your son's baseball caps too. Or baby bonnets...now the wheels are spinning!
- Wreaths - an oldie, but a goodie. I love to pop a wreath in unexpected places. Maybe on the bathroom door, or in the playroom, made out of crayons. Look at this cute one made of ties! You can make a wreath out of anything, so customize one to your home colors or a favorite hobby. My son is a bit obsessed with balloons, so I'm thinking of making a balloon wreath for his birthday. And don't just stop at one! I have a trio of amazing bejeweled wreaths above our media center. A gift from my Nana. They make me smile everyday.
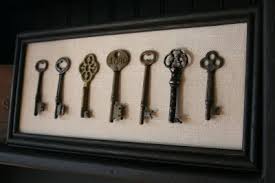
- Frame it! - This category can really include anything. Whatever you love, frame it! Sporting event tickets, wedding invitations, children's artwork, a note from your mom, a jersey, keys. I recently saw someone create a piece of art out of dates. Yep. They typed out the birthdates of each of their kids, the husband and wives' birthdates, and their anniversary date. What a unique, meaningful, and easy thing to do! It's officially on my "to do" list!
- Empty Frames - while we're on the topic of frames, why not use them to create some negative space? A few empty frames in the same color can make as much impact as framed art, and sometimes more. Play with different size combinations and see what you can do!
- Collections - We mentioned hats already, but do you have a stash of seashells from a past trip? Or some amazing beaded necklaces? Or what about colorful spatulas, or silver spoons? Use one of the empty frames from above and fill it with whatever moves you. When we first moved into our home, guests we're arriving any minute and my spare room wasn't quite finished. Luckily my mom was in town and in 15 seconds she nailed up an empty frame and stuck a mini collection of twine balls on nails inside the frame. It. Was. Awesome. I've gotten so many compliments on the 3-D art that was born out of a moment of desperation.
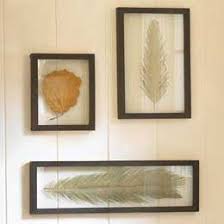
- DIY - can't find a print you love in the colors that work in your home? Make it yourself! So you don't fancy yourself an artist? It's a-okay. Trace a printout of your monogram on a canvas and paint it in. Get out your favorite colors and splash some paint around (Jackson Pollock anyone?). Use sidewalk chalk on black paper. Glue some scrapbook paper you love onto canvases. Frame a favorite piece of music. Put a cool looking leaf in a shadow box. Go ahead and try it. What's the worst that could happen? You just might discover a hidden talent.
What clever things have you hung on the wall? Anyone planning a gallery wall?
Monday, January 23, 2012
Grocery Saving Lesson 3 - Ecoupons
I hope you've been following the weekly couponing tips. It is a fabulous and easy way to save big!
We touched on this briefly in Lesson 1, but it deserves its own section. This is a huge, and often untapped, resource for coupons. If your store uses a rewards card, go to the following sites and register your card. Every month you can load new coupons to it. When the cashier scans your card, the coupons take effect like magic!
http://www.cellfire.com/
http://www.pgesaver.com/
http://www.ecoupons.com/
Remember, many ecoupons also have paper coupons to go with them. At some stores, you can use 1 ecoupon and 1 paper coupon on the same item. Who doesn't love that?! Unfortunately, my store stopped allowing this, so if yours only takes one of the other, make sure you hand the cashier your paper coupons BEFORE you scan your savings card, or you won't be able to use your higher dollar paper coupon. However, if you'd rather use the ecoupon, scan away!
Friday, January 20, 2012
Fun Friday! - Do it Yourself Spice Mixes
Happy Friday y'all! I love to cook, and using fresh, homemade ingredients makes me love it even more! Yesterday I spotted this pin on Pinterest for DIY Ranch, onion soup, and taco seasoning. As always, you can click the picture and it will take you to the actual link.

What a great idea, right?! I LOVE it! In fact, I'm already envisioning the cute labels I'll make for the jars. Score one for cutting costs, one for cuteness, and one for healthy living. Happy cooking and happy weekend!
What a great idea, right?! I LOVE it! In fact, I'm already envisioning the cute labels I'll make for the jars. Score one for cutting costs, one for cuteness, and one for healthy living. Happy cooking and happy weekend!
Thursday, January 19, 2012
Closet Progress - A HUGE Step in the Right Direction
Well, it's safe to say that our master closet is now useable again. I stayed up really late one night and made it happen. I had visions of the hubs tripping on abandoned hangers in the dark hours of the early morning.
You remember where we started? Then, I had a canvas bin "Aha" moment. Then, just came some thinking. What items kept tripping us up? Definitely the colossal wall of belts and scarves. Hey! I love me some pretty scarves!

Yikes! When I did want to wear a scarf, pull one down...you know the rest.
Other areas of distress were hats, winter scarves, socks, my tennis clothes, and the stacks of sweatshirts/pants...the Big Man's "lounge wear". Hats we don't wear all the time, but for working out and tennis matches, they needed to be accessible. Winter scarves are a rare need in Hotlanta. Socks definitely needed some sort of container on eye level. My tennis clothes were previously stacked on one of the wire shelves under my hanging tops. Athletic clothes = slippery. Those skirts were forever falling between the rungs and causing me great stress! Perhaps a bin? The lounge wear. I get that everyone needs some comfy sweats to hang in, but they're such a bulky mess! The stacks never stay straight, they fall over, and hubs never folds them back correctly!
We already had some plastic 3-drawer bins leftover from my classroom days. They had already proved their utility at holding the delicates so if two sets is good, 4 is better!
Before:

After:

A drawer for scarves....

A drawer for my belts....

A drawer for my socks....

There are also drawers for my tennis clothes, the frequently needed hats, undegarments, etc. So far, we are LOVING it! With all the scarves tucked away, I now have a place to hang my robe (Our His and Her robes used to share a hook, but somehow mine always wound up on the floor...).

Here's another before and after, because they're just so fun!
Before:

After:

Wow! Really terrible lighting in that 2nd photo (no windows in the closet), but you can see the infamous canvas bins. They now hold seldomly used hats (sun hats, etc) and winter scarves. The dresses were really cleaned out as well. I wound up storing the spring/summer frocks so that the fall/winter ones could hang better. Who wears a sundress in January anyways right?
You can just see the stacks of "lounge wear" back there. I'm still brainstorming good ways to keep that stuff looking neat and tidy. Any tips?
Here are the last of the "after" pics for now. Of course, I plan to go back in and label the drawers, rehang the hooks for the robes, convert to just one type of hanger, perhaps put in a mirror in the blank space above the short shelves. I'm also working on a new clothes hanging system called clustering. You take all the items that make outfits and hang them together. No more forgetting that the lace skirt looks great with the denim shirt. We'll see how it goes. Now that the function is under control...let the prettying begin!


Well, there you have it. Closets are really hard to photograph. No natural light and you can't get any perspective because you can't step back! Oh well. Hopefully you see the improvement we've been feeling the past few days. I smile every morning.
I can't wait to make it even better. Maybe paint an accent wall?!? Who's with me?
What projects have you been working on? Ever have one task lead you to take on 14 others at the same time?
You remember where we started? Then, I had a canvas bin "Aha" moment. Then, just came some thinking. What items kept tripping us up? Definitely the colossal wall of belts and scarves. Hey! I love me some pretty scarves!

Yikes! When I did want to wear a scarf, pull one down...you know the rest.
Other areas of distress were hats, winter scarves, socks, my tennis clothes, and the stacks of sweatshirts/pants...the Big Man's "lounge wear". Hats we don't wear all the time, but for working out and tennis matches, they needed to be accessible. Winter scarves are a rare need in Hotlanta. Socks definitely needed some sort of container on eye level. My tennis clothes were previously stacked on one of the wire shelves under my hanging tops. Athletic clothes = slippery. Those skirts were forever falling between the rungs and causing me great stress! Perhaps a bin? The lounge wear. I get that everyone needs some comfy sweats to hang in, but they're such a bulky mess! The stacks never stay straight, they fall over, and hubs never folds them back correctly!
We already had some plastic 3-drawer bins leftover from my classroom days. They had already proved their utility at holding the delicates so if two sets is good, 4 is better!
Before:

After:


A drawer for my belts....

A drawer for my socks....

There are also drawers for my tennis clothes, the frequently needed hats, undegarments, etc. So far, we are LOVING it! With all the scarves tucked away, I now have a place to hang my robe (Our His and Her robes used to share a hook, but somehow mine always wound up on the floor...).

Here's another before and after, because they're just so fun!
Before:

After:

Wow! Really terrible lighting in that 2nd photo (no windows in the closet), but you can see the infamous canvas bins. They now hold seldomly used hats (sun hats, etc) and winter scarves. The dresses were really cleaned out as well. I wound up storing the spring/summer frocks so that the fall/winter ones could hang better. Who wears a sundress in January anyways right?
You can just see the stacks of "lounge wear" back there. I'm still brainstorming good ways to keep that stuff looking neat and tidy. Any tips?
Here are the last of the "after" pics for now. Of course, I plan to go back in and label the drawers, rehang the hooks for the robes, convert to just one type of hanger, perhaps put in a mirror in the blank space above the short shelves. I'm also working on a new clothes hanging system called clustering. You take all the items that make outfits and hang them together. No more forgetting that the lace skirt looks great with the denim shirt. We'll see how it goes. Now that the function is under control...let the prettying begin!


When I cleaned out the toiletries from the linen closet, there wasn't any room for my nail polish box or bath supplies. No prob! I stuck them in these cute bins from the Target dollar spot and now they are readily accessible.


Well, there you have it. Closets are really hard to photograph. No natural light and you can't get any perspective because you can't step back! Oh well. Hopefully you see the improvement we've been feeling the past few days. I smile every morning.
I can't wait to make it even better. Maybe paint an accent wall?!? Who's with me?
What projects have you been working on? Ever have one task lead you to take on 14 others at the same time?
Wednesday, January 18, 2012
Closet Update...and Two Mini-Makeovers
Well, after a pretty late night and 4 MORE bags for Goodwill, I'm feeling like the closet and I are in a good place. As I've said before, I've cleaned out my closet before, lots of time. However, in a month or two, we'd be back to where we started. Which you can see from the previous post on the closet, is NOT a good place to be!
I didn't want to just clean up for nothing, so we spent some days with hangers all over the floor, a pile of clothes in the corner, and, well, chaos. Lots of days. Far too many days for my perfectionist, neat-freak personality to take. But I perservered. I had to figure out how to solve this closet dilemma once and for all. And that meant, not just putting everything back.
I knew some canvas bins were in order so I loaded up the Little Man and we searched. We hunted. We came home empty handed. I couldn't find what I had in mind. A nautral colored, canvas bin. Not too tall. Able to sit longways on the shelf. Like the ones in the linen closet. Oh. Duh.
Dontchya love it when you alreay own what you have in mind!?! So this led to me emptying out the linen closet all over the landing upstairs. See, as you already know, I coupon, so I have a mini drug store in my house. Deodorant, face lotion, body wash. I've got it all...in the linen closet. Hmmm. In order to get to those canvas bins, I had to get the toiletries out (which I'd been dying to do anyways, they were way too heavy for the bins). Where you ask? Well, the sheets were in an old chest of drawers at the top of the stairs, because the toiletries were in the linen closet...because that makes sense. Where do I come up with this stuff?
So, the toiletries migrated to the chest of drawers. So perfect! Why didn't I think of that ages ago? The sheets got refolded Martha Stewart style in the linen closet (where they belong). And the canvas bins were mine!


Disclaimer: This is the oldest, worst, dresser in the world. It was a Goodwill find for my very first apartment, but with a coat of paint and new knobs, it's still making itself useful...until the one I have my eye on makes its way home ;)


Neither of these spaces is perfect yet. But, keep in mind, these were spurr of the moment makeovers in order to "steal" the canvas bins for another project. Don't you worry. I'll be come back to these babies soon, label maker blazing!
Now, the Mister got home during the refolding of the linens. And man was the upstairs landing a sight to behold. Pair that with the natural disaster-esque scene in our closet and you can imagine his face.
Me: "You know what I always say, right?"
Him: "It has to get worse before it gets a lot better."
Such a good student!
Whew! Typing up this process has almost exhausted me as much as doing it the first time did! Those bottles of body wash are heavy y'all! So I will load some pics to show you the progress and make my next post the great closet reveal. Get excited!
Subscribe to:
Posts (Atom)
Popular Posts
-
 Happy Wednesday folks! We're half way to the weekend! I just love fall weekends... ...but back to work! We have a home binder to or...
 -
 In honor of my little man's impending 3rd birthday, I've been hitting up Pinterest hard. Who hasn't seen the cute birthday ball...
 -
 Well, this little blog of mine will turn 1 on Wednesday...technically. However, I didn't really put much into my blogging until abo...